Search This Blog

Tuesday 20 November 2012

Software Serial Arduino

Hello!

In the previous post I have spoken about the JY MCU Bluetooth Module, wiring using the Serial Port of our Arduino and a basic example but, how about if you want to use the Serial Port to another thing and you want to continue using the JY MCU? Can we emulate a Serial Port with digital I/O of our Arduino?. Of course, Yes!.

It's very easy. We only need to connect our JY MCU Bt following this schematic:


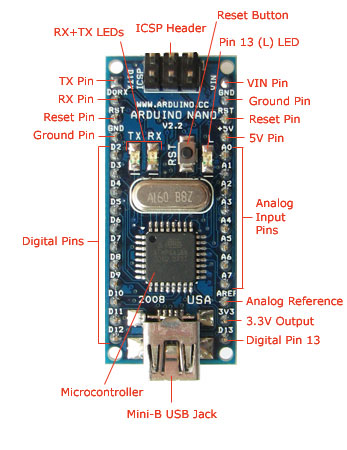
TX BT Module ------------------> Digital Pin 10 Arduino
RX BT Module ------------------> Digital Pin 11 Arduino
VCC BT Module <---------------> 3,3V Pin Arduino
GND BT Module <---------------> GND Pin Arduino

Note: Of course, you can choose the Digital I/O which you prefer. Then, in the code source, we configure them.


 Code:


#include <SoftwareSerial.h>

SoftwareSerial mySerial(10, 11); // RX, TX
char lecturaSerie = Serial.read();
int led = 13;

void setup()  
{
   Serial.begin(9600); // Open serial communications and wait for port to open:
  
  mySerial.begin(9600); // set the data rate for the SoftwareSerial port
}

void loop() // run over and over
{
  if (mySerial.available())

   {
     if (mySerial.read() == '1')
      digitalWrite(led, HIGH);   // set the LED on
      Serial.println("LED ON");        
   }
   {
     if (mySerial.read() == '2')
      digitalWrite(led, LOW);   // set the LED on
      Serial.println("LED OFF");      
   }
  delay(100);                    // wait 100ms for next reading
}


In this code source, We use the library SoftwareSerial.h to emulate a Serial Port in the digital ports 10 and 11... and then, if Arduino receives de conditions "1" or "2", it switchs on or switchs off a Led and sends a message through the original Serial Port.


See you!!

Saturday 17 November 2012

JY MCU Bluetooth Module

Hello!!

Today I'm speaking about the JY MCU Bluetooth Module which I bought several days ago in Deal Extreme. It's a good and cheap option and almost a plug and play device to play with wireless connections using your Arduino.


JY MCU Bluetooth Module

Wiring:

It's very easy. You only have to connect four pins (TX, RX, VCC and GND) in this way:

TX BT Module ------------------> RX Pin Arduino
RX BT Module ------------------> TX Pin Arduino
VCC BT Module <---------------> 3,3V Pin Arduino
GND BT Module <---------------> GND Pin Arduino

JY MCU Bluetooth Module Test Assembly


Testing:

Well, we have our Arduino and our BT Module connected. Remember, I didn't configure anything in our BT Module (the Settings can be configured but now we are going to work with default settings)... but Now we need another device that will connect with our Arduino Nano. In this case, I have used my Android Mobile running a classic BT App (this make it possible to connect and send/receive basic strings that will be interpreted by the embedded software of our Arduino).

The App is Amarino 2.0:


Here, we can send and receive basic strings to our connected device (it connects directly, the default PIN Code is 1234, and de baudrate is 9600)... but We need to do something with de data sent by the mobile, so we need the Arduino Code.


Code:

I have done a basic programme with the following features:

  • If I send the number "1" the led switchs on.
  • If I send the number "2" the led switchs off.
  • If I send the number "3" the led blinks once.

And the code is:


char lecturaSerie = Serial.read();
int led = 13;

void setup() {                

  pinMode(led, OUTPUT);  
  Serial.begin(9600);
}

void loop() {
  if( Serial.available() )       // if data is available to read
  {
    lecturaSerie = Serial.read();         // read it and store it in 'val'
  }
  if ( lecturaSerie == '1' )
  {
  digitalWrite(led, HIGH);   // set the LED on
  }
  if ( lecturaSerie == '2' )
  {
  digitalWrite(led, LOW);   // set the LED on
  }
  if ( lecturaSerie == '3' )
  {
  digitalWrite(led, HIGH);   // turn the LED on (HIGH is the voltage level)
  delay(1000);               // wait for a second
  digitalWrite(led, LOW);    // turn the LED off by making the voltage LOW
  delay(1000);               // wait for a second
  }
  
  delay(100);                    // wait 100ms for next reading
}


Note: To upload the code to the Arduino you need to disconnect the BT Module. 
Note2: When your BT Device isn't connected, a red led will be blinking, and if it's "pair" this led will be swiched on.


See you!!


Android Apps: Arduino Companion

Hello!

If you are beginning with Arduino you need a reference and Android gives us some possibilities, for example this app: Arduino Companion by Jens C Brynildsen.


This App is very useful if you need an off-line reference about functions, libraries, control structures... and with a lot of basic examples which help us to learn more about the Arduino Programming. 

Some caps: 
App Caps. Google Play Store.


See you!

Friday 16 November 2012

Arduino Nano Compatible

Hello!

Arduino project is an open-source electronics prototyping platform based on flexible, easy-to-use hardware and sofware. It's very nice to see how an open-source projetc is so important and has a lot of data and users on the Internet.

Today I am going to tell you something about the Arduino Nano. This is the little child of the Arduino's family, but it offers a lot of options and very interesting features.


If you want to know more about Arduino Nano you can visit this page:


But in this post I don't want tell you more things about the features and data of the Arduino Nano (it's boring and you have the web of Arduino to read about the specifications of this device). In this post I want to talk about the Arduino Compatible Nano V3.0 of Deal Extreme.


This isn't the real and authentic Arduino, but this is a very cheap option with the same features and specifications and it's very good to begin in Arduino's World. Three weeks ago I ordered it and now I have it in my hands. It's perfect to test your electronic projets using Arduino's platform and if you have a protoboard you will be able to probe it quickly.

For example, the classic Hello World: A led blinking.

/*
Blink
Turns on an LED on for one second, then off for one second, repeatedly.
This example code is in the public domain.
*/
void setup() {
// initialize the digital pin as an output.
// Pin 13 has an LED connected on most Arduino boards:
pinMode(13, OUTPUT);
}
void loop() {
digitalWrite(13, LOW); // set the LED on
delay(1000); // wait for a second
digitalWrite(13, LOW); // set the LED off
delay(1000); // wait for a second
}


Verify... Compiling... Upload (simply conect your USB to the mini-USB port of your Nano, Select on Tools --> Board --> Arduino nano w/ AtMega328 and go on!).


See you in the next chapter :)

Hello World!


I admit it, it isn't my first time, other blog projects died on the way, but I think that this is the definitive blog... The most important blog in my life because it's about one of my passions: Electronics... and crazy geek ideas.

Welcome and I hope it is useful to everybody... and sorry for my English, I'm trying to improve it :)